How to Use the Service
Service Details
The service operates via it's own dedicated API and can be found at 4760 (uncertificated) and 5760 (https) (see also Working with ITAS APIs).
Browser
The simplest method to test access/availability is to directly query the service though a browser such as Chrome. One of the main benefits to using ODATA is the availability of metadata (information describing the shape of the data expected) and this can be queried using:
https://localserver:5760/$metadata
This will provide a breakdown of the areas of data available including Data Entities, Functions (reports) and Actions. Each schema lists the properties (name and type) available for selection.
Excel
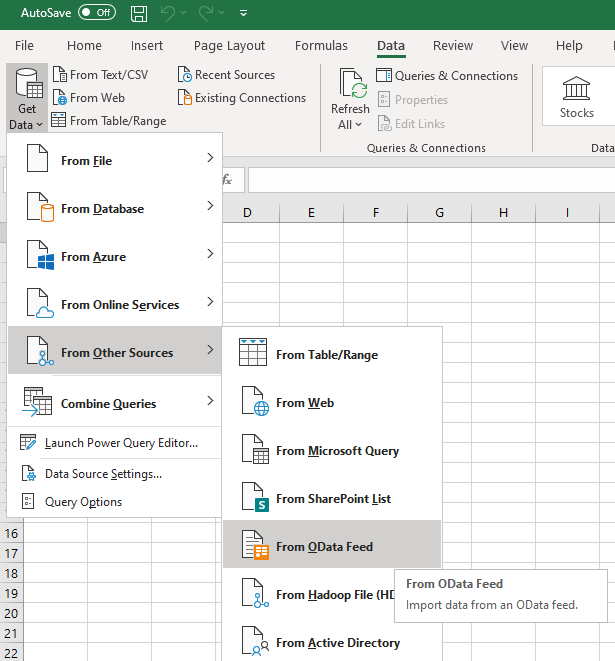
The most practical use for this service is to feed data into Excel:

Image for Microsoft 365
Apply the address as https://localserver:5760 (or http://localserver:4760 for uncertificated access) where localserver is the address of the main application server hosting ITAS API's, and you will be presented with a Navigator window displaying the endpoints available to you. Choose an object, preview and Load the data into the spreadsheet. If using the service for the first time you will be prompted to authenticate your credentials - see Security (Permissions) below.
From here you can save the spreadsheet and and re-use by simply refreshing the data. Visualisations such a pivot tables can be created and refreshed in this way.
Power BI
This works exactly the same as Excel but depending on whether you are running on-premise or cloud, you may have to manage access to the API through a firewall or consider other options such as a VPN.
Samples
Both Excel and Power BI provide the ability to create bespoke queries through an Advanced Editor. The Power Query M Code enables filtering and modelling of the required output for the spreadsheets/visualisations.
It also allows variables to be setup meaning that parameters can be used for common values that can be amended within the application, e.g. Trading Entity.
The following samples assume Parameters have been setup for the address of the API (https://localserver:5760) as ODataServiceURL and Trading Entity as TECode.
- When working with Data Entities it is likely you will want to only include data for a nominated Trading Entity (company); this can be achieved using a query as follows:
let
Source = OData.Feed(ODataServiceURL & "/ClientAccountBases?$apply=filter(TradingEntityId eq '" & TECode & "')", null, [Implementation="2.0"])
in
Source - When working with Data Entities with sub-Entities (associated data, e.g. a Buyer and its ClientAccount profile) it is possible to efficiently request all related data in a single call. The following uses PhysicalTradeBases (physical contracts) and in addition to selecting 3 properties from this Data Entity it also includes properties from other (sub) Entities * :
let
Source = OData.Feed(ODataServiceURL & "/PhysicalTradeBases?$apply=filter(TradingEntityId eq '" & TECode & "')
&$select=PhysicalTradeId,ContractDate,DepartmentCode
&$expand=PhysicalTradeMain($select=Bags,PackingTypeCode),
PhysicalTradeTraffic($select=BillOfLadingDate,VesselReference),
PhysicalTradePricing($select=PaymentTermCode,Price,PriceTypeCode)
", null, [Implementation="2.0"]),
#"Expanded PhysicalTradeMain" = Table.ExpandRecordColumn(Source, "PhysicalTradeMain", {"Bags", "PackingTypeCode"}, {"Bags", "PackingTypeCode"}),
#"Expanded PhysicalTradeTraffic" = Table.ExpandRecordColumn(#"Expanded PhysicalTradeMain", "PhysicalTradeTraffic", {"BillOfLadingDate", "VesselReference"}, {"BillOfLadingDate", "VesselReference"}),
#"Expanded PhysicalTradePricing" = Table.ExpandRecordColumn(#"Expanded PhysicalTradeTraffic", "PhysicalTradePricing", {"PaymentTermCode", "Price", "PriceTypeCode"}, {"PaymentTermCode", "Price", "PriceTypeCode"})
in
#"Expanded PhysicalTradePricing"
Integration Platform
Working with ODATA through an Integration Platform such as Snaplogic, Power Platform has many advantages. The metadata provided is available to the consuming application and in most cases will be able to be used when building pipelines/workflows. As well as providing a simple method of reviewing properties and types (string, date, integer) it will also allow a more sophisticated form of modelling (filtering, sub-entity expansion and selection) provided by the standard ODATA protocol.
Samples
The following samples will assume a variable of {{host}} identifying the address of the API (https://localserver:5760) and all other variables will also be enclosed in curly brackets {{xxx}}.
- When working with Data Entities it is likely you will want to only include data for a nominated Trading Entity (company); this can be achieved using a filter as follows:
{{host}}/ClientAccountBases?$apply=filter(TradingEntityId eq '{{tradingEntity}}')\ - When working with Data Entities with sub-Entities (associated data, e.g. a Buyer and its ClientAccount profile) it is possible to efficiently request all related data in a single call. The following uses PhysicalTradeBases (physical contracts) and in addition to selecting 3 properties from this Data Entity it also includes properties from other (sub) Entities * :
{{host}}/PhysicalTradeBases?$apply=filter(TradingEntityId eq '{{tradingEntity}}')
&$select=PhysicalTradeId,ContractDate,DepartmentCode
&$expand=
PhysicalTradeMain($select=Bags,PackingTypeCode),
PhysicalTradeTraffic($select=BillOfLadingDate,VesselReference),
PhysicalTradePricing($select=PaymentTermCode,Price,PriceCode,PriceTypeCode)
Security (Permissions)
There are two forms of authentication and as with the other ITAS Services, this is controlled by the ITAS Identity Server.
- For regular users working in Excel, Power BI and so on, it is recommended that they use their own Windows account. This is prompted the first time the user connects to the OData Service and the method to be applied is Basic Authentication
- For system integration purposes you can provide a pre-configured token in the User Name which will provide full access to all data (ask Hivedome to get this token generated)
Technical Note: The Windows account is verified by the Identity Server which will also check the ITAS (CMP) profile and return a token to the application with the appropriate permissions (Trading Entities allowed, any data restrictions).
* in addition to the metadata the Data Catalog also provides a tool for reviewing properties and Data Entity relationships

